Gather Evidence Using the Evidence Disk
The evidence disk is an automatically generated drive that materializes during the conversion of a forensic image to a ForensicVM. This utility drive is populated with directories that carry the same names as the Autopsy tags. These directories serve as designated containers, wherein the forensic investigator is expected to compile and organize evidence relevant to each tag. If ever the need arises, the investigator has the option to reset the evidence disk to its initial state. However, such an action should be approached with caution, as it would entail the deletion of all previously gathered evidence.
In the event that new tags are introduced in Autopsy, corresponding folders for these tags will be fashioned once the plugin is restarted.
Tip
In order to fabricate any missing tag directories, it’s essential to first halt the ForensicVM’s operations. It’s advised to shut down the ForensicVM, subsequently close the plugin, and then reopen it via the Autopsy ForensicVM Client Plugin. This procedure ensures that the environment is refreshed and ready to incorporate new changes.
Evidence Disk Creation
The creation of the evidence disk is an automated process. When you transition a forensic image into a ForensicVM, regardless of whether the method employed is virtualization copy or linking to the forensic image, the evidence disk is fashioned during the final phase of this procedure.

Fig. 139 Screenshot depicting the final phase of the ForensicVM conversion, showcasing the creation of the evidence disk.
Collecting Evidence: A Step-by-Step Guide
Collecting digital evidence is a meticulous process, demanding precision, patience, and an understanding of the system you are investigating. When using the ForensicVM, this process is facilitated, yet there are still specific steps to follow. Here’s a comprehensive guide on how to go about it:
Initiation of the ForensicVM:
Before you can begin your evidence collection, ensure that the ForensicVM is up and running. Start the virtual machine and patiently wait for it to boot up completely.
Logging In:
Once the ForensicVM has completely loaded, proceed to log in using the credentials provided or set during the initial configuration. Remember, maintaining the security and integrity of the login process is crucial in a forensic investigation.
System Exploration:
With access to the ForensicVM, you can now begin your deep dive into the system. Navigate through the directories, files, applications, and logs. Always keep an eye out for suspicious or relevant files, unusual patterns, or any anomalies that might serve as potential evidence.
Copying Relevant Files to the Evidence Disk:
As you uncover potential pieces of evidence:
For Windows Users:
The process is quite straightforward. Simply copy the relevant files or data and save them to the evidence disk, which is typically represented as the D: drive. This dedicated drive serves as a safe repository, ensuring that the original data remains uncompromised.
For Linux Investigation:
Things might be quite different. Instead of having immediate access to the evidence disk, you might need to locate it first. Once found, proceed to mount the disk manually. After which, you can copy and save the necessary files or data to this disk.
Note
Remember, while the process might seem technical, the key is to maintain the integrity of the evidence and ensure that all actions are documented and reproducible. It’s not just about finding the evidence, but also about ensuring its admissibility in a court of law.
Collect Evidence on Windows
Log into Windows
Begin by logging into the operating system. Should there be a need, employ a plugin to either craft a forensicAdministrator user or reset an existing user’s password.

Fig. 140 Windows login screen.
Identify Evidence and the Evidence Disk
Post login, your next objective is to pinpoint the evidence disk. This specific disk is marked with the label possible evidence. Conventionally, it’s designated as drive D:. The very essence of this disk is a collection of folders; each bearing the name of tags available in Autopsy. Though investigators have the liberty to tailor-make folders or sub-folders as per the requirements of their investigation, a suggested practice is to either refine or instate new tags in Autopsy. Post this step, both the Autopsy Plugin and the ForensicVM should be restarted.

Fig. 141 Identification and transfer of evidence.
The Fig. 141 offers a visual guide: The evidence drive is demarcated by a green rectangle, while the Windows Explorer - which is in the process of identifying potential evidence - is enclosed within a red rectangle. The objective here is to locate and transfer the identified evidence into the “possible evidence” drive, ensuring they’re nestled under the appropriate Autopsy Folder Tags.
Example: Transferring the Entire Encrypted BitLocker Drive
The illustration below showcases the entirety of an encrypted BitLocker drive being transferred to the Autopsy ‘Follow Up’ tag. The foundational principle of this process lies in ensuring that the full, unaltered encrypted drive is copied, preserving its integrity for forensic examination. By copying the entire encrypted disk file, forensic analysts can ensure they are working with a complete and untampered set of data.

Fig. 142 Transferring the full encrypted BitLocker drive to the Autopsy ‘Follow Up’ tag.
Pre-importing Considerations for Autopsy
Before integrating the possible evidence drive into Autopsy, it’s imperative to either shut down or stop the forensicVM. Opting for a shutdown is highly recommended. Choosing to merely stop the virtual machine introduces the risk of data corruption which could compromise the integrity of the evidence or render parts of it unusable.

Fig. 143 Options available for safely preserving the BitLocker drive before importing to Autopsy.
Collecting Evidence on Linux
Accessing the System
To embark on evidence collection, the primary step involves gaining access to the Linux system. Knowledge of user credentials is essential. If you find yourself without the necessary credentials, consider utilizing available plugins to assist. Alternatively, developing and sharing a new plugin with the community could be a valuable contribution! The illustration below presents the login process for an Ubuntu 22.10 system featuring a comprehensive desktop environment.

Fig. 144 Ubuntu 22.10 login screen with a full desktop.
Identifying the Evidence Disk
After successfully logging in, launch the file explorer to identify the evidence disk. In the given instance, one would navigate to “Other locations” and subsequently double-click on “possible evidence” to initiate its mounting.

Fig. 145 Identifying the “possible evidence” disk in the file explorer.
Plan Evidence Gathering
Once the evidence drive is appropriately mounted, you’re primed to delve into your evidence search. Displayed in the subsequent figure are folders corresponding to various Autopsy Tags, offering a structured approach to evidence organization.

Fig. 146 Autopsy Tags folders for structured evidence organization.
Explore and find possible evidence
Navigating to the designated folder, we discern a hash dump file alongside potential evidence pointing to the deployment of a meterpreter.

Fig. 147 Highlighting a hash dump file and indications of meterpreter usage.
Organize and Transfer Potential Evidence to the Evidence Drive
Now, to preserve this crucial data, ensure you copy the identified potential evidence to the designated “possible evidence” folder.

Fig. 148 Transferring discovered evidence to the “possible evidence” folder.
Preparing for Autopsy Integration
Before channeling the evidence disk into Autopsy, it’s paramount to adopt one of two measures: either halt the forensicVM operations or completely shut it down. Favoring the shutdown route comes strongly advised, as a mere halt could inadvertently introduce data corruption. Such anomalies might jeopardize evidence integrity or entirely nullify certain data segments. In our context, you’d initiate this by selecting the power icon, followed by the “Power Off/Log Out” option from the ensuing menu.

Fig. 149 Accessing the power options on Ubuntu 22.10.
Concluding the Process
To safeguard all collected evidence, conclude the procedure by opting for “Power Off”, thereby initiating the system’s shutdown.

Fig. 150 Promptly shutting down the system to ensure evidence safety.
Import Possible Evidence Disk into Autopsy
Autopsy is a digital forensics platform. To import a qcow2 evidence disk, first convert it to vmdk. Follow the guide below:
Run the Autopsy ForensicVM plugin on the intended datasource
Begin by launching the Autopsy Case.
Execute the Autopsy ForensicVM plugin on the case datasource.

Fig. 151 Autopsy ForensicVM Plugin Interface
Securely Shutdown the forensicVM
Ensure the forensicVM machine is shut down.
If not, shut down using the “Shutdown VM” button in the Autopsy ForensicVM Client interface.
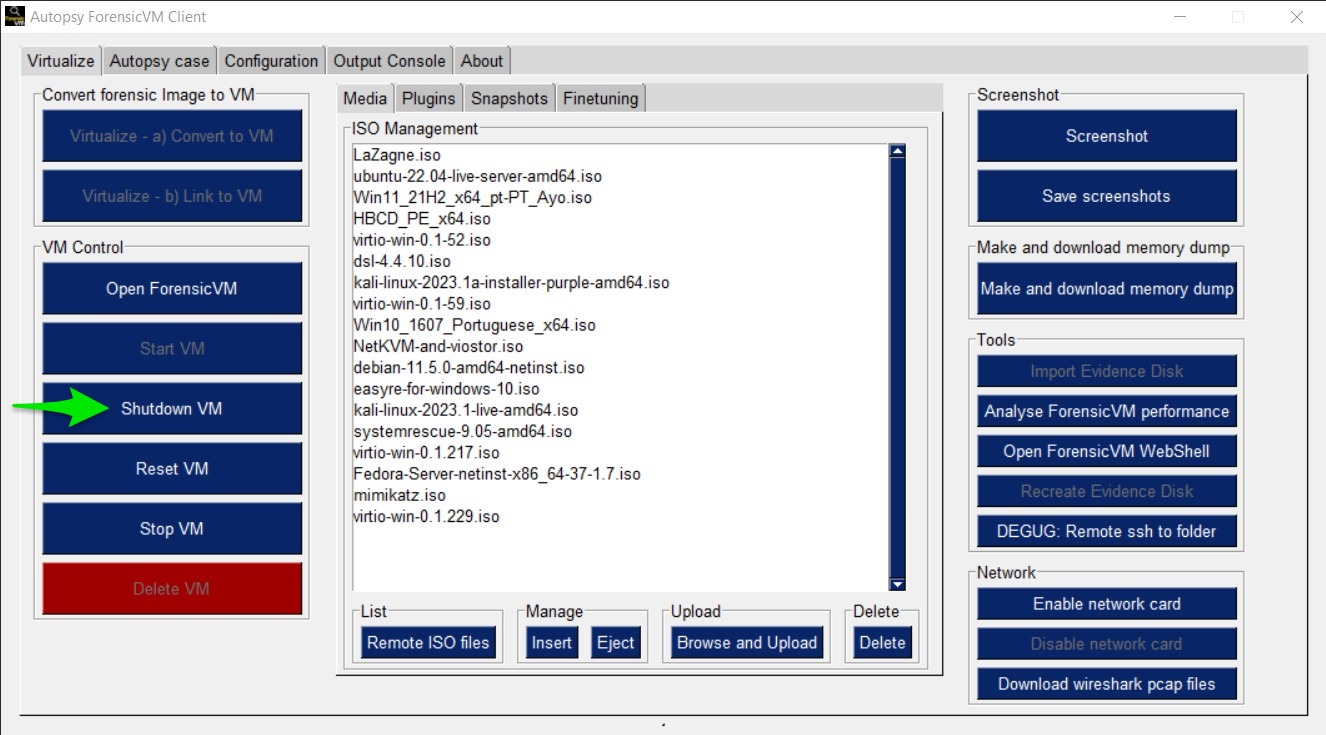
Fig. 152 Shutdown VM Interface
Import evidence disk
Click the “Import Evidence Disk” button.

Fig. 153 Import Evidence Disk Interface
Save evidence disk to default path
A Windows Explorer “Save As” dialog will appear. Retain the suggested path.

Fig. 154 Save As Dialog
Monitor the Download Progress
Wait for the evidence disk download to complete.

Fig. 155 Download Progress Bar
Evidence Disk Informational Popup
A notification popup will display the evidence path.

Fig. 156 Evidence Disk Popup Notification
Locate the Evidence in the Path
Windows Explorer will display the evidence.vmdk path. Copy this path.

Fig. 157 Evidence.*vmdk *in Windows Explorer
Copy evidence disk path
Hold Shift, right-click on evidence.vmdk, and select “Copy as path”.

Fig. 158 Copying evidence.*vmdk *Path
Integrate a New Data Source in Autopsy Software
Click “Add Data Source” in Autopsy.

Fig. 159 Add Data Source Option in Autopsy
Select the Appropriate Host
Select the same host when importing the evidence disk.

Fig. 160 Selecting Host in Autopsy
Specify Data Source Type as VM Image
Choose “Disk Image or VM File” as the data source type.

Fig. 161 Selecting Data Source Type in Autopsy
Enter the previously copied evidence.**vmdk **path
Paste the evidence.vmdk path and set the “Time zone”.

Fig. 162 Inputting evidence.*vmdk *Path in Autopsy
Deselect All Plugins
Deselect all plugins and click “Next”.

Fig. 163 Deselecting Plugins in Autopsy
Conclude the Data Source Addition
Click “Finish”.
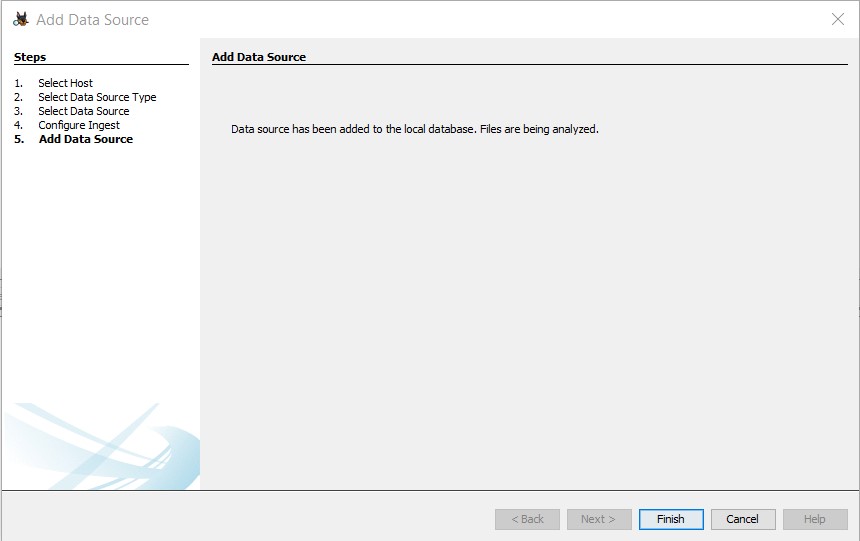
Fig. 164 Finish Button in Autopsy
Locate and Label Potential Evidence
Navigate to each folder and assign the “Notable Item” tag.

Fig. 165 Tagging Evidence in Autopsy
Evidence Successfully Tagged
Tagged evidence will be highlighted.

Fig. 166 Tagged Evidence Display in Autopsy
Update Evidence Disk Tags
During the course of a forensic investigation, there may be instances when you need to append additional tags. Ensuring that the “possible evidence disk” reflects these changes is crucial. The following steps guide you on making sure the tag folders are created on the evidence disk:
Add a New Tag to Autopsy
Navigate to the desired file in Autopsy.
Right-click on the file.
From the context menu, hover over “Add file tag”.
Select the last sub-menu option “New tag…”.

Fig. 167 Adding New Tag in Autopsy
Define the New Tag Name and Type
Input the desired “Tag Name”.
If the new tag denotes something significant or noteworthy, ensure to check the box labeled “Tag indicates item is notable”.

Fig. 168 Defining New Tag Name and Type in Autopsy
Initiate Ingest Modules
Right-click within Autopsy.
Select “Run Ingest Modules” from the dropdown menu.

Fig. 169 Running Ingest Modules in Autopsy
Activate the ForensicVM Client Python Plugin
Deselect all plugins within Autopsy.
Specifically select the “ForensicVM Client” plugin.
Click on “Finish”.

Fig. 170 Selecting the ForensicVM Client Plugin in Autopsy
Boot up the ForensicVM
Start the forensicVM system.

Fig. 171 Starting the ForensicVM System
Access the ForensicVM Interface
Click on “Open ForensicVM”.

Fig. 172 Accessing the ForensicVM Interface
Identify the New Folder Tag
Log into the forensicVM and identify the freshly generated tag folder.

Fig. 173 Identify the New Folder Tag
Tip
For users operating on Windows versions later than 8: If the evidence folder is elusive, ensure Windows is not in hibernation instead of being completely shut down. To bypass this, while shutting down the forensicVM, hold down the [Shift] key on your keyboard. This ensures the hibernation file is removed and the drive is primed to receive instructions. You can then retry the procedure.
Recreate Evidence Disk
Danger
Opting for this action will irrevocably erase all data on the evidence disk! Data recovery will not be possible afterward. Prior to initiating this, ensure to follow the guidelines to Import evidence disk.
Safely Shut Down Windows
To ensure that the evidence.vmdk disk is unlocked, shut down Windows while pressing and holding the [Shift] key. This action ensures the hibernation file is deleted.
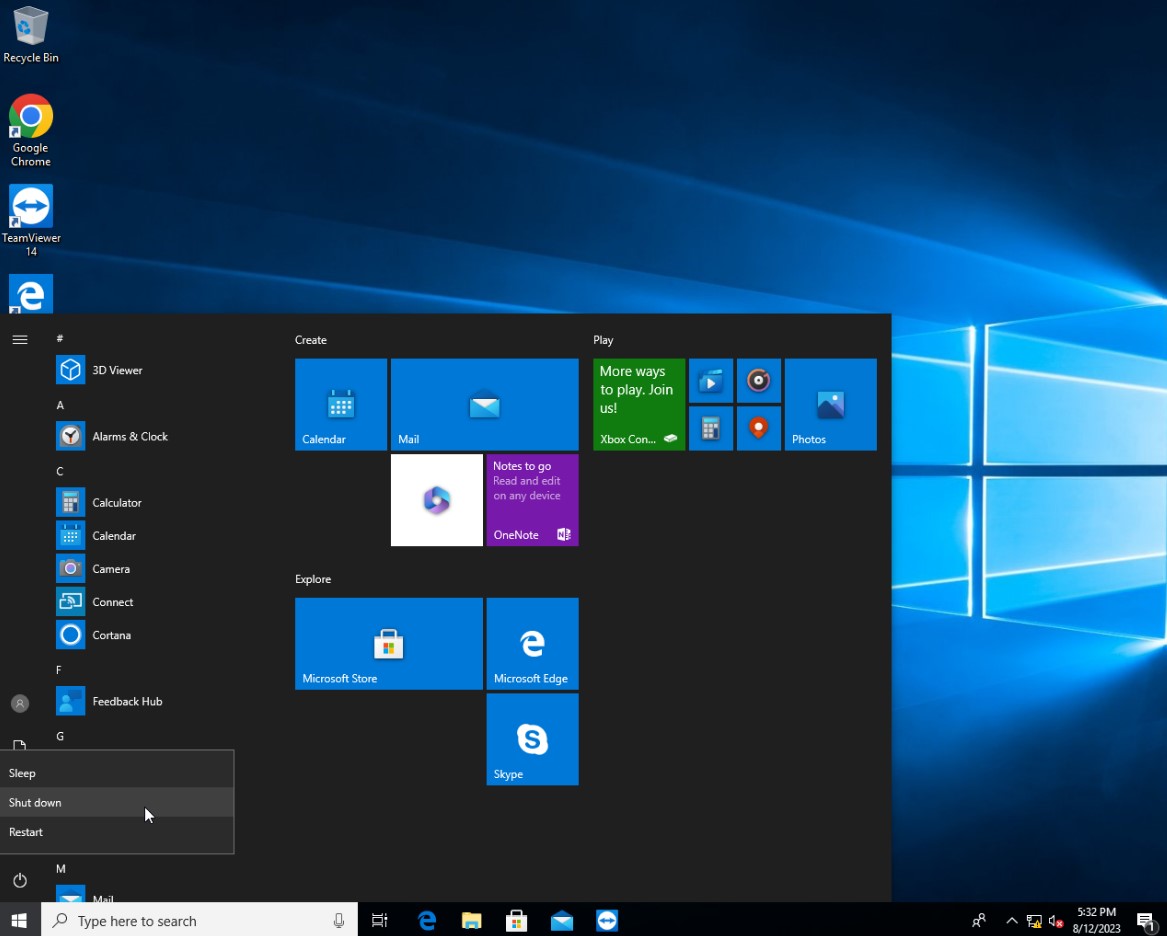
Fig. 174 Safely Shutting Down Windows
Initiate Evidence Disk Recreation
Once the machine is completely shut down, press the “Recreate Evidence Disk” button found on the Autopsy ForensicVM Client Plugin interface.

Fig. 175 Recreate Evidence Disk Button
First Confirmation Dialog
Recreating the evidence disk necessitates its deletion—a critical action. A prompt will appear asking for confirmation on this deletion.
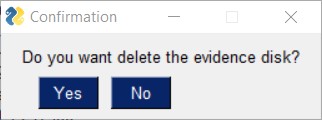
Fig. 176 First Confirmation Dialog
Final Confirmation Message
A subsequent confirmation dialog will be displayed. Click on “YES” only if you are absolutely certain about erasing the current evidence disk.

Fig. 177 Final Confirmation Message
Confirmation of Successful Recreation
Upon successful recreation of the evidence disk, a notification will appear to confirm the action.
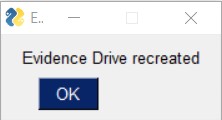
Fig. 178 Successful Recreation Notification
Boot Up the ForensicVM
Proceed to start, access, and log into the forensicVM.

Fig. 179 Booting Up the ForensicVM
Inspect the New Evidence Disk
A freshly recreated evidence disk will be generated with the current Autopsy evidence tags structured as folders. No previously acquired evidence will be included. As a crucial step, remember to Import evidence disk before recreating the evidence disk.

Fig. 180 New Evidence Disk Overview