Snapshots in ForensicVM: A Crucial Asset for Investigators
Why snapshots are so important for a forensic investigation
In the dynamic realm of digital forensics, the ability to preserve, replicate, and revert to specific states of digital evidence is paramount. Snapshots in ForensicVM offer this essential capability. Here’s an in-depth look at why snapshots are indispensable for forensic investigators:
The base snapshot or sometimes referred to as the ‘first snapshot,’ is a reflection of the initial state of a system or a piece of evidence. Just as a crime scene investigator would secure a scene to ensure no contamination occurs, in digital forensics, the base snapshot acts as that secured, untouched crime scene. It represents the data in its original, unaltered form, enabling investigators to always have a pristine reference point.
Digital evidence, by its very nature, is volatile. A single action, intentional or accidental, can alter the evidence, possibly rendering it inadmissible in court. Snapshots act as safety nets. Should the evidence be unintentionally modified or corrupted, investigators can easily revert to a previous snapshot, ensuring the integrity of the evidence remains uncompromised.
Forensic investigation often involves a series of “what-if” scenarios. Investigators may want to test a hypothesis or simulate actions that a suspect might have taken. With snapshots, these simulations can be executed without the risk of permanently altering the evidence. After an analysis, the system can be reverted to its original state using the snapshot, ready for another hypothesis to be tested.
Documentation and Chain of Custody: Every snapshot can serve as a documented step in the investigative process, aiding in maintaining a clear chain of custody.
Efficiency and Speed: Instead of restoring from backups or original sources, which can be time-consuming, snapshots allow for quick reversion, making the investigative process more efficient.
Risk Mitigation: Especially in complex cases involving malware or unknown data structures, snapshots provide a safety mechanism, allowing investigators to explore without risking the primary evidence source or the investigation platform.
Note
Working with Snapshots and ForensicVM
Before diving into the functionalities associated with snapshots, it’s crucial to understand a fundamental prerequisite: the ForensicVM needs to be up and running. Snapshots essentially capture the state of a virtual machine at a specific point in time. As such, to make the snapshot meaningful and functional, the ForensicVM has to be in an operational state.
If you haven’t started your ForensicVM yet, please do so by following these steps:
Open the Autopsy ForensicVM Client: Ensure that you have the client interface open and accessible.
Locate the ‘Start’ Option: Within the interface, navigate to the main control panel where you have options to ‘Start’, ‘Stop’, ‘Shutdown’, etc., for the ForensicVM.
Initiate the ForensicVM: Click on the ‘Start’ option to boot up the ForensicVM. It might take a few moments for the virtual machine to initialize and be fully operational.
Once the ForensicVM is running, you can proceed with snapshot-related tasks, ensuring accurate capture and representation of the virtual machine’s state.
It is highly recommended to create your first snapshot immediately after the machine begins its booting process. Doing so preserves the initial state of the ForensicVM, making it easier to revert back to a clean state at any time during your investigation. Snapshots can be invaluable during forensic investigations, especially when you need to return to a specific point in time or recover from potential mistakes.
Create a snapshot
Open the Autopsy ForensicVM Client: Ensure you have the Autopsy ForensicVM Client interface launched and ready.
Navigate to Snapshot Management: This section is dedicated to creating, viewing, and managing snapshots of your ForensicVM.
Initiate Snapshot Creation:
Click on the “Create new” button located within the Snapshot management area.
Fig. 229 A visual representation of the ‘Create new’ button used for initiating a snapshot creation in the Autopsy ForensicVM Client interface.
Once you’ve successfully created a snapshot, it will be saved and listed in the Snapshot management section. You can then access this snapshot whenever needed to revert your ForensicVM to that particular state.
While the Autopsy ForensicVM Client interface typically auto-updates to display all available snapshots, there may be occasions where the list isn’t refreshed in real-time. In such scenarios, it’s beneficial to use the “List Remote Snapshots” feature to manually fetch and view the list of all remote snapshots associated with the current ForensicVM.
List snapshots
1. Open the Autopsy ForensicVM Client: If not already open, launch the Autopsy ForensicVM Client interface to access the snapshot management features.
Navigate to the Snapshot Management Area: This section provides tools and options related to creating, viewing, and managing snapshots of your ForensicVM.
Manually List Remote Snapshots:
Look for the “List Remote Snapshots” button. This button is specifically designed to fetch the list of snapshots from the remote server and display them within the interface.
Click on the “List Remote Snapshots” button to initiate the listing process.
Fig. 230 A visual guide highlighting the ‘List Remote Snapshots’ button within the Autopsy ForensicVM Client interface.
Once clicked, the interface should update and display all the remote snapshots associated with the current ForensicVM. If any issues persist, ensure that the ForensicVM Client has proper network access and permissions to communicate with the remote server.
I’ve expanded on the process by offering a bit more context and breaking down the steps in a detailed manner.
If you ever find yourself needing to undo changes and revert the forensicVM to a previous state, the snapshot functionality is a powerful tool that allows you to do so. Here’s a step-by-step guide to help you navigate the rollback process.
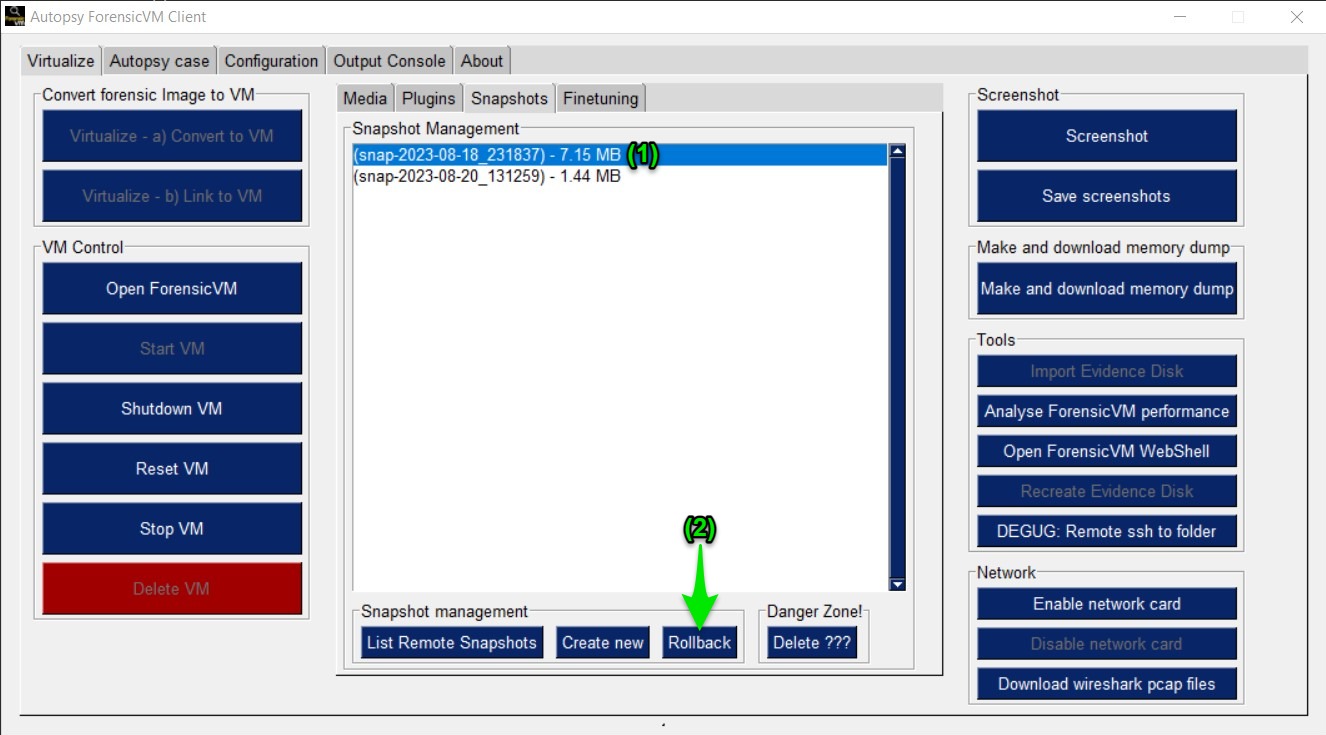
Steps to Reverse to a Snapshot
Locate the Desired Snapshot:
Snapshots are typically named in the format snap-YYYY-MM-DD_HHMMSS.
Browse through the list and find the snapshot that represents the state you wish to revert to.
Click on the intended snapshot. Once selected, it will be highlighted with a blue background and a white foreground, indicating your selection.
Initiate the Rollback:
With the desired snapshot selected, locate and click the rollback button.
Warning
Potential Issues & Solutions:
At times, the rollback process might not go as smoothly as intended. Here’s what to do if you encounter issues:
Stalled ForensicVM: If the forensicVM doesn’t return to its previous state or appears to be stalled:
1. Use the Reset VM option to reset the virtual machine.
2. Once reset, attempt the Rollback action again to revert to the desired state.
Undoing the Rollback: Regrettably, once a rollback has been executed, it is irreversible. This means that the state of the forensicVM just prior to the rollback will be permanently lost.
Best Practice Recommendation:
Before initiating a rollback, it’s highly recommended to create a new snapshot of the current state. This way, if you later decide you want to revert to the state that existed just before the rollback, you’ll have that option available. Simply rollback to the snapshot you took immediately before executing the rollback.
Remember, handling snapshots requires care, as they represent specific points in time of the ForensicVM’s state. Always ensure that you’ve selected the correct snapshot before initiating a rollback.
Snapshots can become redundant or unnecessary over time, and you might want to reclaim some storage space. Deleting a snapshot will free up this space without affecting the current state of your forensicVM. Here’s a step-by-step guide:
Select the Snapshot:
In the list of snapshots, click on the one you wish to delete. The selected snapshot will be highlighted, indicating your selection.
Navigate to the *Danger Zone!* Section:
Once you have the desired snapshot selected, move to the section labeled “Danger Zone!”.
Initiate the Deletion:
Find and click on the button labeled Delete ???.
A confirmation popup will appear to ensure that you truly want to delete the selected snapshot. If certain, proceed by pressing the “OK” button.
Snapshot Deletion Interface
Warning
Always double-check the snapshot you are deleting. Once deleted, it cannot be recovered. It’s a good habit to ensure you have backups or other necessary snapshots before deleting any.
Snapshots in ForensicVM are not just a feature; they are a cornerstone of effective and responsible digital forensic investigations. They safeguard evidence, enable exploratory analysis, and provide peace of mind to investigators, ensuring that the quest for truth remains both accurate and uncompromised.